How do I create/edit a location?
>Creating a new location >Editing a locationCreating a new location
Hurray! We're happy to see you add another location to your business. Scroll down to see how to create one
How do I do it?
1. Select Settings. A Settings screen is displayed. Select Locations under Organization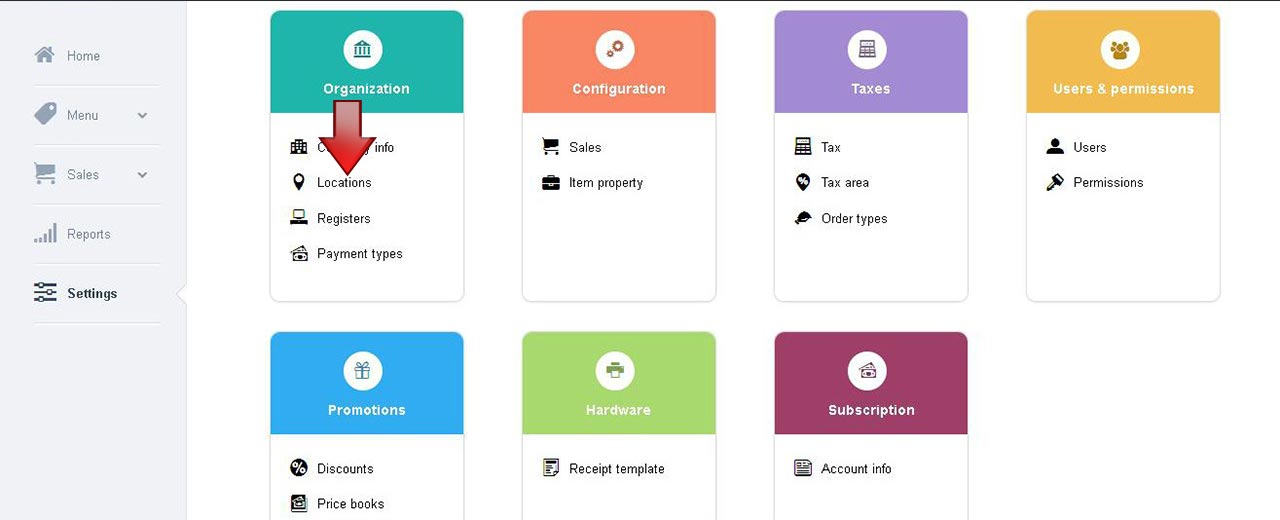
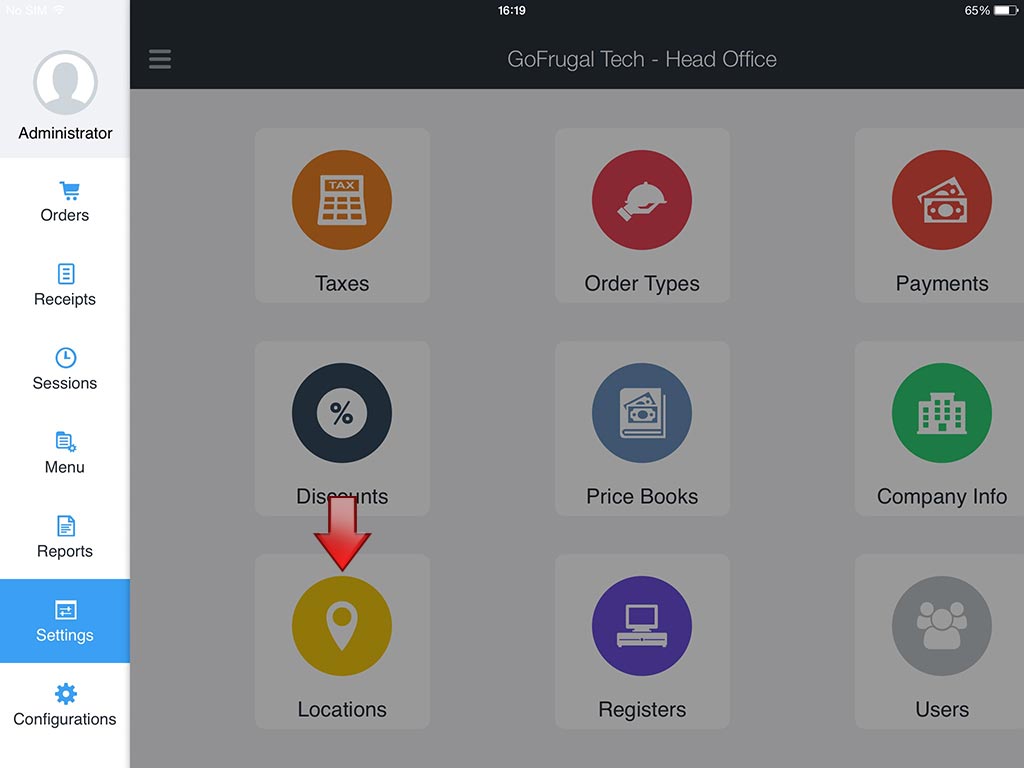
Note: The Locations screen can be accessed in ios app like below
2. A Locations screen is displayed. Select Add location

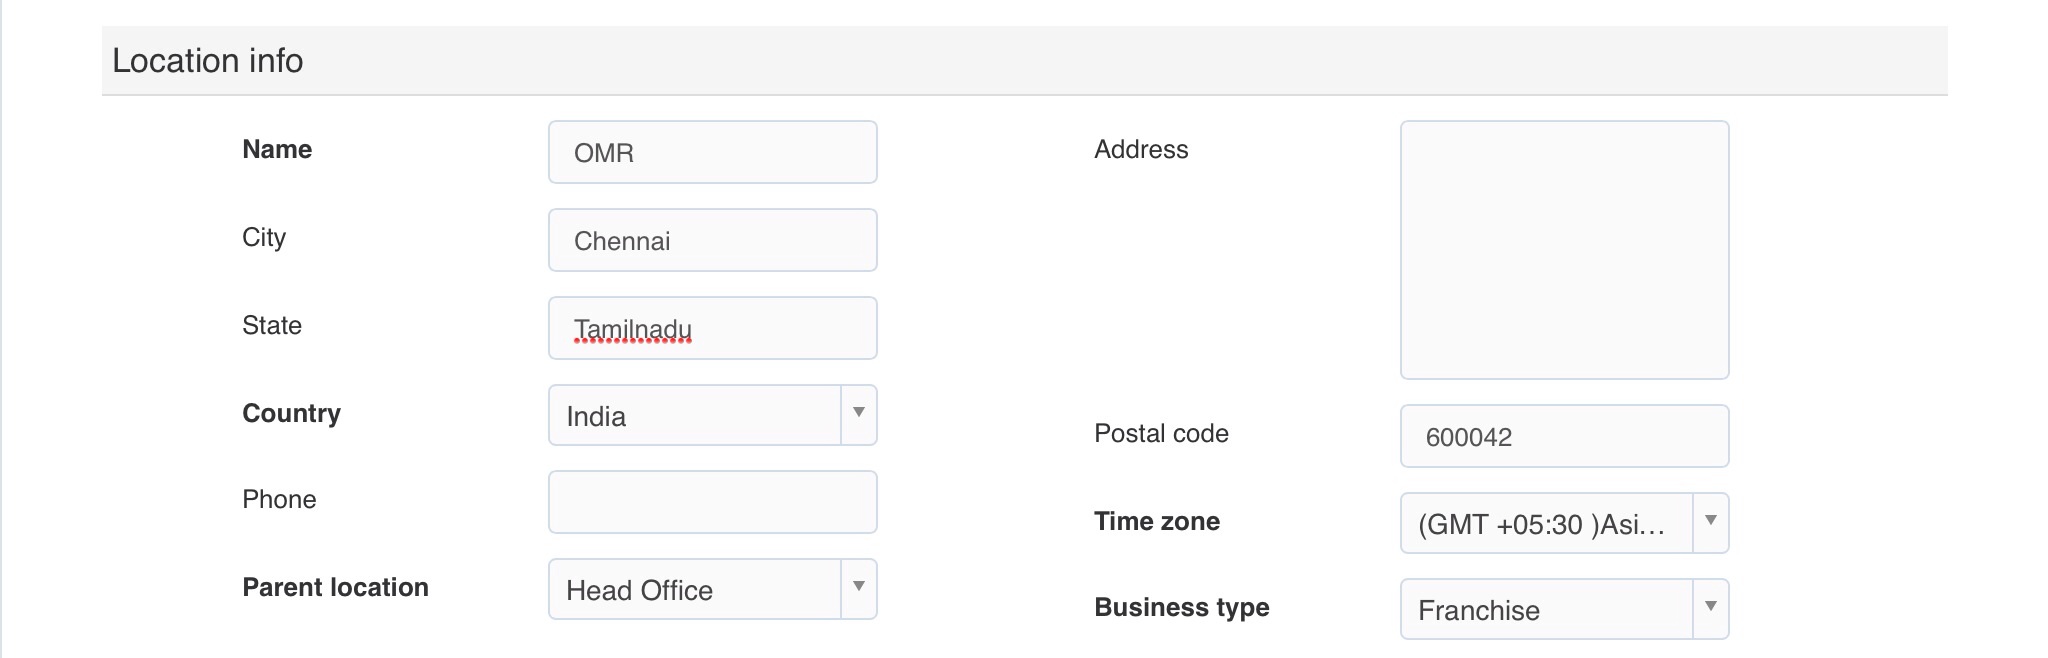
3. An Add Location screen is displayedThe Locations screen has sections Location info, Configuration and Receipt templates The Location info section, contains fields Name, Address, City, State, Country, Postal code, Phone, Time zone, Parent location, Business type In the Name field, enter the name of the location In the Address field, enter the address of the location In the City field, enter the city in which the location resides In the State field, enter the state in which the location resides In the Country field, select the country in which the location resides In the Postal code field, enter the relevant postal code of the location In the Phone field, enter the contact phone number In the Time Zone field, select the relevant timezone of your location from the drop down list In the Parent location field, select the parent location from the drop down list In the Business type field, select the business type from the available options
The Configurations section, contains fields Tax area, Invoice prefix, Invoice sequence, Refund sequence, Tax id and License id In the Tax area field, select the state to apply the tax. This option is available only when the country is India In the Invoice prefix field, enter the prefix which gets appended before the Invoice/ Refund sequence. This can be alpha numeric In the Invoice suffix field, enter the suffix which gets appended after the Invoice/ Refund sequence In the Invoice sequence field, enter the starting sequence number for the receipt In the Tax id field, enter the tax id number issued for the location In the License id field, enter the license id number of the location
Note: By default, the value described for Invoice prefix, Invoice suffix and Invoice sequence would be loaded to the Registers screen automatically.

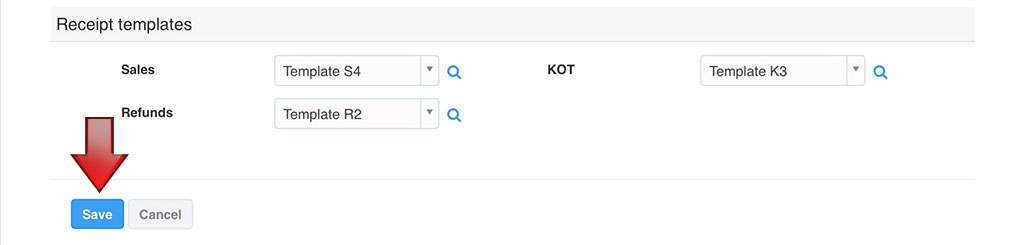
The Receipt template section, contains print templates for Sales, KOT and Refund. The mapped template will be used as the print profile for that location transactions In the Sales field, on selecting any one of the six default templates, a magnifier appears. On selecting the magnifier a pop up appears showing the template design for sales. In the KOT field, on selecting any one of the six default templates, a magnifier appears. On selecting the magnifier a pop up appears showing the template design for KOT. In the Refund field, on selecting any one of the six default templates, a magnifier appears. On selecting the magnifier a pop up appears showing the template design for refund.
4. Select Save, to create the new location
Note: The Status of the Location created is set, Active by default.
Note: By default, the value described for Invoice prefix, Invoice suffix and Invoice sequence would be loaded to the Registers screen automatically.
4. Select Save, to create the new location
Note: The Status of the Location created is set, Active by default.
Editing a location
1. Select Settings. A Settings screen is displayed. Select Locations under OrganizationNote: The Locations screen can be accessed in ios app like below
2. A Locations screen is displayed. Select Edit location

3. An Edit Location screen is displayedThe Locations screen has sections Location info, Configuration and Receipt templates The Location info section, contains fields Name, Address, City, State, Country, Postal code, Phone, Time zone, Parent location, Business type In the Name field, enter the name of the location In the Address field, enter the address of the location In the City field, enter the city in which the location resides In the State field, enter the state in which the location resides In the Country field, select the country in which the location resides In the Postal code field, enter the relevant postal code of the location In the Phone field, enter the contact phone number In the Time Zone field, select the relevant timezone of your location from the drop down list In the Parent location field, select the parent location from the drop down list In the Business type field, select the business type from the available options The Status field, is Active by default. Click to change the status as Inactive
The Configurations section, contains fields Tax area, Invoice prefix, Invoice sequence, Refund sequence, Tax id and License id In the Tax area field, select the state to apply the tax. This option is available only when the country is India In the Invoice prefix field, enter the prefix which gets appended before the Invoice/ Refund sequence. This can be alpha numeric In the Invoice suffix field, enter the suffix which gets appended after the Invoice/ Refund sequence In the Invoice sequence field, enter the starting sequence number for the receipt In the Tax id field, enter the tax id number issued for the location In the License id field, enter the license id number of the location
Note: By default, the value described for Invoice prefix, Invoice suffix and Invoice sequence would be loaded to the Registers screen automatically.
The Receipt template section, contains print templates for Sales, KOT and Refund. The mapped template will be used as the print profile for that location transactions In the Sales field, on selecting any one of the six default templates, a magnifier appears. On selecting the magnifier a pop up appears showing the template design for sales. In the KOT field, on selecting any one of the six default templates, a magnifier appears. On selecting the magnifier a pop up appears showing the template design for KOT. In the Refund field, on selecting any one of the six default templates, a magnifier appears. On selecting the magnifier a pop up appears showing the template design for refund. The Status field, is Active by default. Click to change the status as Inactive
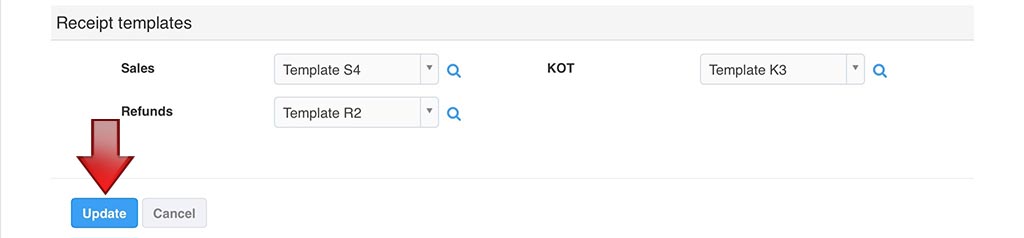
4. Select update, to save the edited location
Note: By default, the value described for Invoice prefix, Invoice suffix and Invoice sequence would be loaded to the Registers screen automatically.
4. Select update, to save the edited location
